 Google Apps are web-based office tools for any size of business. Applications like Gmail, Google Calender, Google Docs and Google Sites collectively named Google Apps. These apps can be integrated with your own domain very easily and quickly. Google Apps are available in several edition you can choose from as per your needs. In this tutorial we’ll be using the Standard Edition, which is free but with some limitations.
What to use Google Apps for?
I mainly use Google Apps for using Gmail as an email service. I use Google Apps because is it reliable and more secure. Apart from Gmail you can use various other Apps like Google Documents, Google Calender and Google Sites.
How to integrate Google Apps with your domain?
First of all register you domain with Google Apps by visiting the registration link.
On the Google Apps sign-up page:
- Check on the Administrator box.
- Enter your domain name (you can even buy a domain with Google Apps, see at your right hand side) Click Get Started.
- Enter the Required information on the next page.
- Create your first administrator account by enter the required information (this is the account that you will use to manage you domain).
- Go through Terms and Conditions. And Click ‘I accept. Continue with set up.‘
You have registered your domain with Google Apps, now its time to verify the domain. Before you can begin using Apps, you must verify that you own the domain.
Google provides 3 options for verifying the domain:
- Add a DNS record to your domain’s configuration
- Add a meta tag to your site’s home page
- Upload an HTML file to your server.
You can choose any one the above for verifying your domain with Google Apps. In this tutorial we’ll continue with the second option, ‘Add a meta tag to your site’s home page.‘
- Click on the Second option check box.
- Copy the meta tag from the box and paste it to your site’s home page, in the head section.
If Using WordPress:
Goto Dashboard -> Appearance -> Editor -> Header.php.
And add the meta tag behind any other meta tag you see there.
Save the page and return to the Google Apps verify page and click on the verify button.
Google Apps Dashboard
Your domain is now verified, you can now login to the Google Apps Dashboard. By going to http://www.google.com/a/{domain-name}
You can now configure different services. Create more use accounts. (In standard edition you can only create up to 50 user accounts.)
How to Activate Gmail on your domain?
Note: Before proceeding ensure that you have made backups of your earlier emails, it may be default email service of your hosting or any other service. Please ensure that you have made proper backups otherwise all your earlier emails will be lost.
1. Click Email link in dashboard.
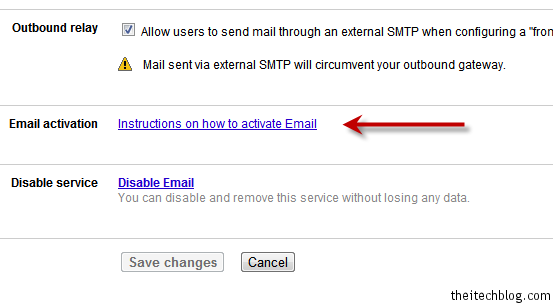
2. For activating Gmail on you domain you need to do some changes in the DNS of your domain. For detailed procedure scroll down and click on the ‘Instructions on how to activate Email‘ link .
Do the required changes and additions in DNS records, it will take some time for changes to activate and start working.
3. You can also set a custom web address for accessing your emails, for eg. mail[dot]domain-name[dot]com.
4. For setting a custom name go back to the email page at Google Apps dashboard and click on ‘Change URL’ link.
Activating Other Applications
In a same manner you can activate other Google Apps and set a custom access url for each of them.
You have successfully integrated the Google Apps with you domain. You can now use Google Applications to make your business more productive and your important data more secure.
How you finding Gmail and other Google’s services with your own domain, do let us know in comments. And If you are experiencing any problem feel free to Ask me.


